Knowing how to set up a tarp can save a camping trip when the weather suddenly turns against you. Few things are more frustrating than scrambling for shelter as rain starts pouring, wind picks up, and your campsite becomes exposed to the elements. A properly pitched tarp provides fast, reliable protection from rain, sun, and wind, making it one of the most valuable skills every camper, backpacker, and outdoor enthusiast can learn.
Over the years, we’ve spent countless hours researching shelter systems, studying proven tarp configurations, and evaluating what works best in real-world camping conditions. For this guide, we analyzed the most popular tarp setups used by experienced campers and outdoor adventurers, comparing them based on weather protection, ease of setup, ventilation, stability, and beginner-friendliness. The goal was simple: identify the tarp shelters that are practical, dependable, and easy for beginners to master.
Whether you’re preparing for your first tarp camping trip, looking for a lightweight alternative to a tent, or building an emergency shelter in the backcountry, choosing the right setup can make a significant difference in comfort and safety. In this guide, you’ll learn six proven tarp shelter methods, the essential knots needed for secure pitching, common mistakes that cause tarp failures, and expert tips to help you stay dry and protected in a variety of outdoor conditions.
Quick Answer: How Do You Set Up a Tarp?
Setting up a tarp involves five basic steps:
- Choose a safe campsite with good drainage.
- Secure a ridgeline between two trees or poles.
- Drape the tarp evenly over the ridgeline.
- Stake out the corners and guylines.
- Adjust tension to prevent sagging and water pooling.
Most beginners should start with an A-frame tarp shelter because it is simple to pitch, offers reliable weather protection, and works well in both rain and moderate wind.
Understanding Tarp Shelters
What is a Tarp Shelter?
A tarp shelter is a lightweight outdoor shelter made from a waterproof tarp that is suspended using trees, poles, guylines, and stakes to provide protection from rain, wind, and sun.
A tarp shelter is a simple yet highly effective form of outdoor accommodation, typically constructed from a waterproof fabric sheet that is pitched using poles, trekking poles, or natural anchor points like trees. Unlike traditional tents, tarps offer an open-air experience, allowing campers to connect more intimately with their environment while still providing crucial protection from elements such as rain and harsh sun. The inherent adaptability of a tarp makes it a favorite among minimalist backpackers and bushcraft enthusiasts.
How We Evaluated These Tarp Setups
For this guide, we researched and compared the most popular tarp shelter configurations used by campers and backpackers. We also drew on practical outdoor experience setting up tarp shelters in different weather conditions, including rain, moderate wind, and warm summer camping environments.
Each tarp setup was evaluated based on ease of pitching, weather protection, ventilation, interior living space, and overall reliability for beginners. We also considered common campsite challenges such as water runoff, condensation, and stake security to determine which shelters offer the best balance of simplicity and performance.
The recommendations below are designed to help beginners learn proven tarp setups while understanding when and where each shelter performs best.
Benefits of Using a Camping Tarp
Utilizing a tarp for camping presents numerous advantages over conventional backpacking tents, making it a preferred choice for many experienced outdoor enthusiasts. Tarps are significantly lighter and more compact, reducing pack weight and volume, which is crucial for long hikes, allowing for different ways to set up your shelter. They offer superior ventilation, minimizing condensation, and provide a larger protected living space, ideal for cooking or group gatherings, especially when using a rain tarp. Furthermore, the versatility in shelter setups allows for adaptation to various terrains and weather conditions.
Essential Gear for Tarp Setup
To successfully set up a tarp, a few essential pieces of gear are indispensable for ensuring a stable and effective shelter. Foremost, a high-quality camping tarp, preferably lightweight and waterproof, is crucial. You will also need a robust ridgeline, guylines for securing the corners and sides, and stakes or pegs to anchor the tarp firmly to the ground. Additionally, tarp poles or trekking poles are often required, especially when natural anchor points are scarce, to create the necessary height and structure for your chosen pitch.
Essential Knots for Tarp Setup
Bowline Knot for Anchoring
The Bowline knot is an indispensable skill for any camper looking to securely anchor their tarp. This knot forms a fixed, non-slipping loop at the end of a rope, which is perfect for attaching guylines to a tree, a rock, or any other sturdy anchor point without fear of it coming undone under tension. Its reliability and ease of untying, even after bearing a heavy load, make it superior to many other knots for creating strong, dependable attachment points in your tarp setup.
Expert Tip: Practice tying the Bowline, Taut-Line Hitch, and Clove Hitch at home before your camping trip. Being able to tie these knots quickly can save valuable time when setting up a tarp in rain, strong wind, or fading daylight.
Taut-line Hitch for Adjustable Tension
The Taut-line Hitch is a crucial knot for maintaining optimal tension in your tarp setup, allowing for easy adjustments as conditions change. This knot creates a movable loop that slides along a taut rope, enabling you to tighten or loosen guylines without retying them. It is particularly useful for fine-tuning the pitch of your tarp, preventing sagging due to rain or wind, and ensuring your shelter remains taut and secure throughout your camp, adapting effortlessly to environmental shifts.
Clove Hitch for Securing Stakes
The Clove Hitch is an excellent knot for quickly and securely attaching your guylines to stakes or poles, forming a snug and reliable connection. This knot is simple to tie and untie, yet it holds firm under consistent tension, which is vital for maintaining the stability of your tarp shelter, particularly when using a prusik knot. Its efficiency makes it perfect for rapid setup and breakdown, ensuring that each corner of the tarp is firmly pegged, providing maximum protection against unforeseen gusts of wind or a sudden downpour during your camping trip.
Tarp Setup Comparison Table
Before choosing a tarp shelter, it’s helpful to understand how each setup performs in different conditions. The table below compares the most popular tarp configurations based on difficulty, weather protection, and ideal use cases.
| Tarp Setup | Difficulty | Rain Protection | Wind Protection | Interior Space | Best For |
|---|---|---|---|---|---|
| A-Frame | Easy | Excellent | Good | Good | Beginners and general camping |
| Lean-To | Easy | Moderate | Excellent | Excellent | Cooking, campfires, and wind protection |
| Plow-Point | Easy | Excellent | Excellent | Limited | Quick storm shelters |
| Diamond/Diagonal | Medium | Good | Good | Moderate | Hammock camping |
| C-Fly | Medium | Excellent | Good | Good | Wet conditions and ground protection |
| Cave/Tarp Tent | Advanced | Excellent | Excellent | Moderate | Maximum privacy and severe weather |
The 6 Essential Pitch a Tarp
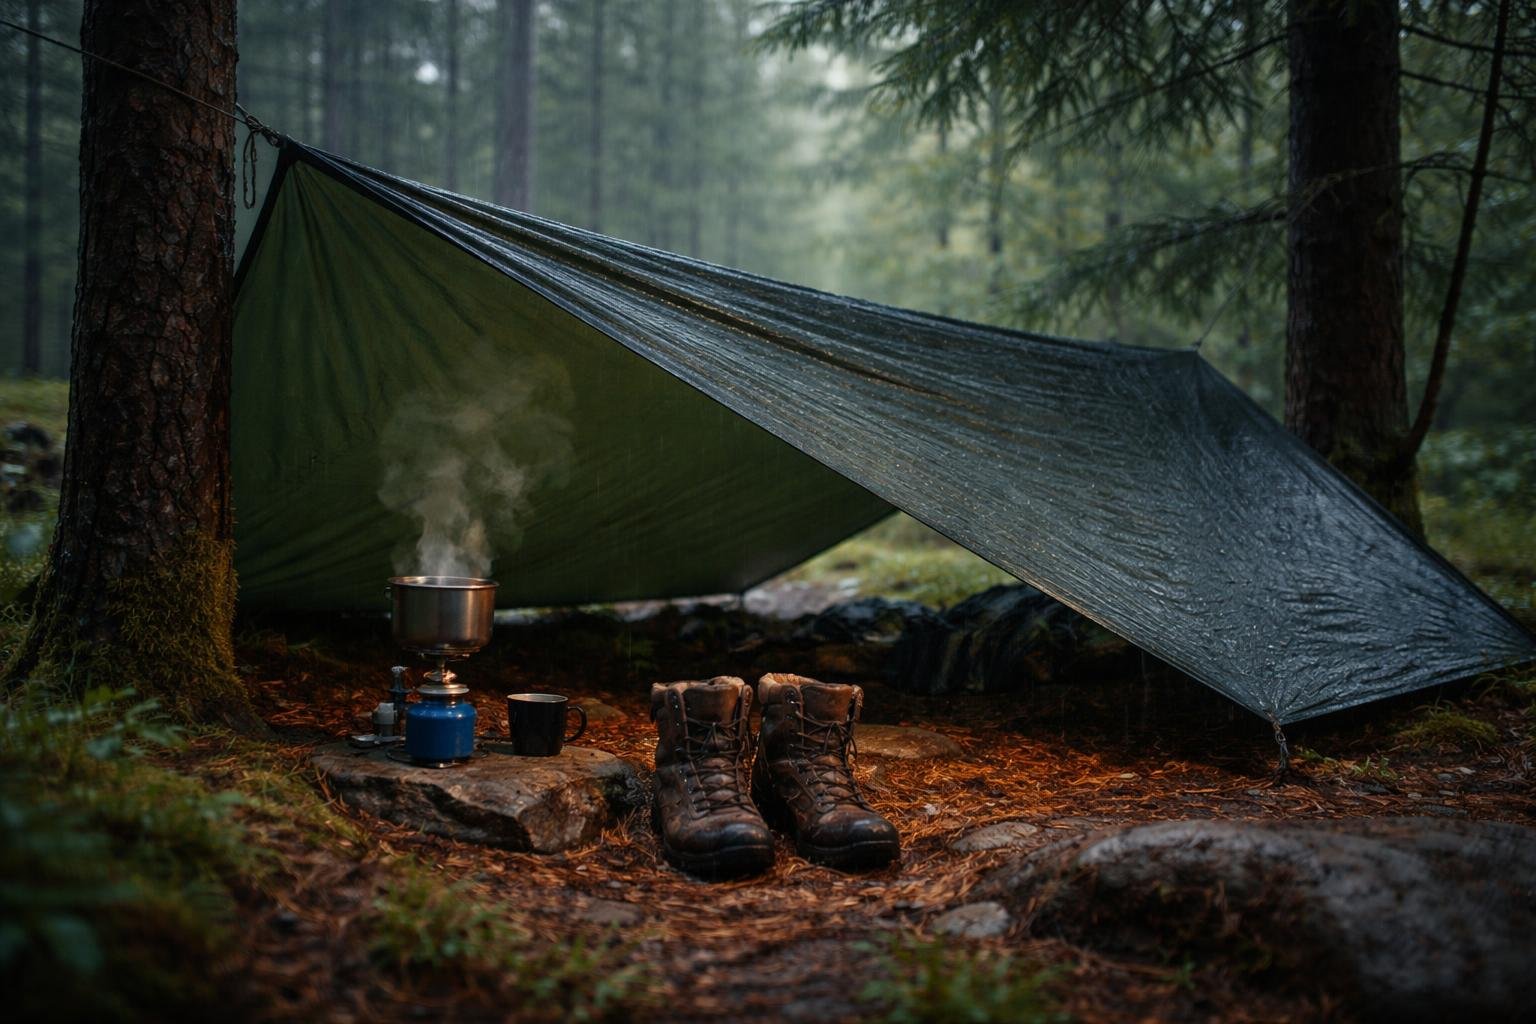
1. Classic A-Frame
The Classic A-Frame is arguably the most common and straightforward way to pitch a tarp, offering excellent protection from rain and wind while providing ample headroom. To set up this shelter, you’ll need to find two trees or use two trekking poles to create a ridgeline, which forms the main structural support. Drape your camping tarp over this ridgeline, then extend guylines from each corner of the tarp to stakes firmly driven into the ground, pulling the sides of the tarp taut. This creates a stable, tent-like structure, perfect for a single camper or two.
Expert Tip: Pitch your A-frame tarp lower when rain or strong winds are expected. A lower pitch improves weather protection and reduces the chances of wind-driven rain entering the shelter.
2. Lean-To (Best for Wind/Cooking)
The Lean-To is an incredibly versatile tarp shelter, particularly effective when you need protection from strong winds or wish to cook beneath your shelter. To set up this pitch, find two trees or use two poles to create a high front edge. Angle the tarp down towards the ground, securing the lower corners with stakes. The open side of the tarp faces away from the wind, providing a reflective surface for a campfire to radiate heat into the shelter, making it ideal for both warmth and cooking during a cool camp, especially with a well-placed rain tarp.
Expert Tip: Always position the open side of a Lean-To shelter away from the prevailing wind. This simple adjustment can dramatically improve comfort and weather protection.
3. Plow-Point (Best for Quick Storm Shelter)
For a rapid and robust storm shelter, the Plow-Point pitch is a lifesaver, offering maximum protection from driving rain and wind with minimal setup time. This method involves finding a central anchor point, such as a tree or a single trekking pole, to elevate one corner of the tarp. The remaining three corners are then pulled out and staked tightly to the ground, creating a low-profile, triangular shelter that sheds water efficiently. This setup is perfect for backpackers needing a quick, secure refuge during an unexpected downpour, especially when using a rain tarp.
Expert Tip: Keep one corner of your tarp pre-rigged with a guyline. During unexpected storms, this allows you to deploy a Plow-Point shelter much faster than starting from scratch.
4. Diamond/Diagonal (Best for Hammocks)
The Diamond/Diagonal pitch is specifically designed to provide extensive coverage for hammock campers, ensuring you stay dry and comfortable even in heavy rain. To create this tarp shelter, you’ll need to lash one corner of the tarp to a tree directly above your hammock’s suspension line, ensuring a secure ridge. The opposite corner is pulled taut and staked to the ground, while the two remaining corners are stretched out diagonally and also secured with guylines and stakes. This orientation provides a wide, protective canopy that effectively sheds rain away from your hammock.
5. C-Fly (Built-in Ground Cloth)
The C-Fly pitch is an ingenious tarp setup that offers both overhead shelter and a built-in ground cloth, maximizing protection and privacy, especially in wet conditions. This method involves using a larger camping tarp and folding it in half or in a specific way to create a floor section and a roof section. One side of the tarp acts as the ground sheet, while the other rises to form the overhead shelter, supported by poles or a ridgeline. The edges are then staked out, creating a secure, enclosed space that keeps you off the damp ground.
6. Cave/Tarp Tent (Maximum Privacy/Weather Protection)
For ultimate privacy and robust weather protection, the Cave or Tarp Tent pitch transforms your tarp into a nearly enclosed shelter, rivaling traditional backpacking tents. This setup involves creating a ridgeline between two trees or poles, similar to the A-frame. However, instead of simply staking out the corners, the sides of the tarp are brought closer to the ground, often secured with additional guylines and pegs to create a lower profile and minimize exposure to the elements. This configuration significantly reduces wind penetration and maximizes internal warmth, making it ideal for harsh conditions.
Which Tarp Setup Should You Choose?
If you’re new to tarp camping, start with the A-Frame because it’s the easiest setup to learn and provides dependable protection in most conditions. Choose the Lean-To for cooking or campfire use, the Plow-Point for emergency storm protection, the Diamond setup for hammock camping, the C-Fly for wet ground conditions, and the Cave/Tarp Tent when maximum weather protection and privacy are needed.
5 Common Tarp Setup Mistakes Beginners Make
Learning how to set up a tarp is relatively simple, but a few common mistakes can lead to leaks, poor weather protection, or even a collapsed shelter. Avoiding the errors below will help you stay dry, comfortable, and safe during your camping trips.
1. Pitching the Tarp Too High
Many beginners set up their tarp too high off the ground. While this can improve airflow, it also allows wind-driven rain to enter the shelter. In wet or windy conditions, a lower pitch usually provides better protection.
2. Ignoring Wind Direction
Failing to account for wind direction is one of the most common tarp camping mistakes. Always position the most protected side of your shelter toward the prevailing wind to reduce drafts and improve stability.
3. Leaving Guylines Too Loose
Loose guylines can cause fabric sagging, water pooling, and reduced weather resistance. Keep all guylines properly tensioned and check them periodically throughout your trip.
4. Choosing a Poor Campsite
Even the best tarp setup can struggle in a bad location. Avoid low-lying areas where water may collect and look for campsites with natural wind protection and good drainage.
5. Setting Up Under Dead Branches
Before pitching your tarp, always look up. Dead or damaged branches, often called “widowmakers,” can fall unexpectedly during storms or high winds and pose a serious safety hazard.
Expert Tip
Most tarp setup problems are caused by campsite selection rather than the tarp itself. A simple A-Frame pitched in a well-chosen location will usually outperform a complex shelter set up in a poor campsite.
Common Pain Points in Tarp Setups
Dealing with Fabric Sagging
One of the most frequent frustrations when learning to set up a tarp is dealing with fabric sagging, especially after a period of rain or due to temperature fluctuations. To combat this, ensure all guylines are initially pulled taut during the setup, utilizing the Taut-line Hitch for easy adjustment. Regularly check the tension throughout your camp, particularly as the tarp material may stretch or contract. Strategic placement of additional attachment points and guylines, especially along the side of the tarp, can also prevent the material from drooping, maintaining a stable and effective shelter, which is essential for car camping.
Preventing Water Pooling
Water pooling on your tarp shelter is not only inconvenient but can also compromise the integrity of your pitch and potentially lead to rips. The key to preventing this issue lies in creating sufficient slope and tension across the tarp’s surface. When you pitch a tarp, ensure there are no flat spots where water can collect. Adjust your ridgeline and guylines to create a steep enough angle, allowing rain to run off freely. Utilizing a trekking pole or an improvised support to slightly elevate specific areas can also eliminate potential pooling zones, keeping your campsite dry.
Expert Tip: Before going to sleep, check your tarp tension one final time. Changes in temperature and moisture can cause some tarp materials to stretch, creating low spots where water may collect overnight.
Securing Stakes in Loose Dirt
Securing stakes firmly in loose dirt can be a major challenge, leading to a collapsed shelter during a downpour or strong winds. To enhance stability, try to find roots, rocks, or other natural features to place your stakes against. If the ground is uniformly loose, burying larger objects like logs or rocks and tying your guylines to them can provide a more substantial anchor. Alternatively, using deadman anchors (sticks or rocks buried horizontally) or extended tent stakes, along with the reliable Clove Hitch, will greatly improve the holding power of your tarp setup.
Expert Tip: Carry two or three extra stakes in your pack. They weigh very little and can make a huge difference when you encounter rocky ground, loose soil, or high winds.
Minimizing Condensation
While tarp shelters are inherently well-ventilated compared to traditional backpacking tents, condensation can still occur, particularly in humid or cold conditions. To minimize this, select a campsite with good airflow, avoiding damp depressions or areas directly next to still water, especially when planning to put up a tarp. Pitch your tarp in a way that allows for maximum ventilation, perhaps slightly raising one side of the tarp, without compromising weather protection. If possible, avoid cooking directly under your tarp, as the moisture released contributes significantly to internal condensation, ensuring a drier and more comfortable shelter.
Pro-Tips for Successful Tarp Camping
Checklist Before You Pitch
Before you pitch a tarp, a crucial step in ensuring a secure and effective shelter is to conduct a thorough site scout. This involves carefully observing your chosen campsite for potential hazards and optimal conditions. Look for suitable anchor points such as sturdy trees or large rocks that can be used to rig your ridge line or lash guylines for effective tarp support. Assess the ground for evenness, drainage, and the presence of roots or sharp objects that could damage your camping tarp or impede stake placement, ensuring a solid foundation for your rain tarp. This proactive approach prevents common issues and ensures a stable tarp shelter from the outset of your camp.
Checking Wind Direction
Understanding and accounting for wind direction is paramount when setting up any tarp shelter to prevent collapse and maximize protection. Before you pitch a tarp, observe the wind’s prevailing direction by feeling it on your face or watching vegetation movement. Position the most enclosed side of your tarp setup, such as the back of an A-frame or the lower side of a Lean-To, to face directly into the wind. This strategic placement allows the wind to flow over and around your tarp, rather than catching it like a sail, ensuring the stability and integrity of your shelter even during a sudden downpour.
Looking Up for Dead Branches
A critical, often overlooked, safety measure before you pitch a tarp is to meticulously look up for dead branches, commonly known as “widowmakers.” These branches, especially those hanging precariously over your chosen tarp setup area, pose a significant hazard as they can fall unexpectedly, particularly during windy conditions or a heavy rain event, potentially causing serious injury or damaging your camping tarp. Always choose a spot free from such overhead dangers, ensuring your campsite is safe and your tarp shelter remains intact throughout your stay in the wilderness.
Frequently Asked Questions
How big of a tarp do I need for camping?
The ideal tarp size depends on the number of people and your intended use. For solo camping, an 8×10-foot tarp is usually sufficient. Two campers may prefer a 10×12-foot tarp, while larger groups often benefit from a 12×16-foot tarp or bigger for increased coverage and comfort.
Can a tarp replace a tent?
Yes, a tarp can replace a tent in many camping situations. Tarps are lighter, more versatile, and provide excellent ventilation. However, they offer less privacy and insect protection than traditional tents, making them best suited for campers who are comfortable with open-air shelters.
What is the easiest tarp shelter for beginners?
The A-Frame shelter is widely considered the easiest tarp setup for beginners. It requires minimal equipment, is quick to pitch, and provides reliable protection from rain and moderate wind while maintaining good ventilation.
How do you set up a tarp in the rain?
When setting up a tarp in the rain, secure the ridgeline first and immediately drape the tarp over it to create overhead protection. Once the tarp is in place, stake out the corners and adjust the guylines to create sufficient tension and water runoff.
What knot is best for tarp camping?
The Taut-Line Hitch is one of the most useful knots for tarp camping because it allows you to easily adjust guyline tension without retying the knot. The Bowline and Clove Hitch are also essential knots for secure tarp setups.
Can you use trekking poles for a tarp shelter?
Yes, trekking poles are commonly used to support tarp shelters when trees are unavailable. They are lightweight, easy to adjust, and work well for setups such as the A-Frame, Lean-To, and C-Fly shelter configurations.
How do you stop a tarp from sagging?
To prevent sagging, keep all guylines properly tensioned and use adjustable knots such as the Taut-Line Hitch. Regularly check tension throughout your trip, especially after rain or temperature changes that may cause the tarp fabric to stretch.
Is tarp camping safe in strong winds?
Tarp camping can be safe in strong winds when the shelter is pitched correctly. Choose a protected campsite, face the most enclosed side toward the wind, use strong anchor points, and keep the tarp profile low to improve stability.
What size tarp works best for one person?
An 8×10-foot tarp is generally considered the best all-around size for solo campers. It provides enough coverage for sleeping, gear storage, and weather protection without adding excessive weight to your pack.
Can you sleep under a tarp without a tent?
Yes, many backpackers and minimalist campers sleep under a tarp without a tent. A properly pitched tarp provides effective protection from rain and sun, although additional bug protection may be needed in areas with mosquitoes or other insects.
Conclusion
Learning how to set up a tarp is one of the most useful outdoor skills you can develop. Whether you’re preparing for a backpacking trip, building an emergency shelter, or simply looking for a lightweight alternative to a tent, the right tarp setup can provide dependable protection from rain, wind, and sun.
If you’re just getting started, begin with the A-Frame setup and practice pitching it several times before your next camping trip. As your confidence grows, experiment with other configurations like the Lean-To, Plow-Point, and Cave Shelter to handle different weather conditions and camping environments.
With the right knots, proper site selection, and a little practice, you’ll be able to build a secure tarp shelter almost anywhere your adventures take you.