If you’re wondering how to set up a tent, getting it right can make your entire camping trip more comfortable and stress-free. A properly pitched tent protects you from the elements and gives you a reliable place to rest. This step-by-step guide will walk you through the process, whether you’re new to camping or just want to improve your setup skills. From choosing the right tent to securing it firmly, you’ll learn everything you need to build a dependable outdoor shelter.
Choosing the Right Tent for Your Camping journey
Selecting the good tent is paramount for a successful camping journey, especially when considering the corner of the tent for stability.. Consider the weather conditions you expect to encounter and the number of campers. A family canopy requires more space and durability compared to a solo camping sunshade. Always choose a shelter that suits your specific needs to enhance your camping knowledge and provide adequate protection from the elements.
Types of Camping shades
Camping shelters come in various types, each designed for specific purposes, including those that can anchor your tent effectively. From backpacking tents to family tents, understanding the differences will help you pick the right canopy for your next Appalachian adventure. Dome tents are popular for their ease of setup, while cabin tents offer more space. Consider the type of camping you’ll be doing to choose the most suitable shelter for your needs, and ensure a smooth sunshade arrangement for camping in the wilderness.
Factors to Consider When Choosing a Tent
When selecting a camping shelter, several factors come into play. Consider the tent’s capacity, weight, and weather resistance. Check the shelter floor material for durability and waterproofness, as well as the quality of the shelter poles at the top of the tent. The rainfly is also essential for protection against rain. These considerations will guide you in choosing a sunshade that meets your needs for your camping trip.
How to Pick the Right Size for Your Group
Picking the right size shelter depends on the number of people you plan to accommodate. A general rule is to add one person to the stated capacity for added comfort. For instance, a three-person canopy is ideal for two adults. A family canopy should provide ample space for everyone, including gear, to ensure a comfortable camping knowledge for everyone pitching their shelter.
Preparing Your Campsite for Tent Setup
Preparing your campground is a critical step before you assemble your canopy. A well-prepared campground ensures a comfortable and safe camping experience. This involves selecting the best spot, clearing the area of debris, and creating a level base for your canopy. Taking the time to prepare your campground will make pitching your canopy a breeze and contribute to a more enjoyable stay inside the tent.
How to Pick the Right Camping Tent
Choosing the right tent involves balancing size, weight, and weather protection. Consider the type of camping you plan to do, whether it’s backpacking or family camping. A lightweight tent is crucial for backpacking, while a spacious family tent is better for car camping. Also, consider the weather conditions and the level of protection your tent can provide for you and your family.
Main Steps for Setting Up Your Tent
Setting up your shelter involves a series of steps that, when followed correctly, ensure a stable and secure shelter. These steps generally include:
- Finding the perfect spot and clearing the ground.
- Assembling the shelter poles and attaching the tent body.
- Staking the canopy.
Mastering these steps will enable you to place your tent quickly and efficiently during your camping adventure.
Finding the Perfect Spot
Finding the best spot is the first step in setting up your shelter, ensuring it’s clear of obstacles around the tent.. Look for a level area free from large rocks, roots, and other debris. Consider the slope of the land to avoid water pooling inside the canopy. Also, check for overhead hazards, such as dead branches that could fall. A well-chosen spot makes pitching your shelter easier and contributes to a more comfortable camping experience, helping you enjoy a comfortable night.
Clearing the Ground and Setting Up a Level Base
Once you’ve found the perfect spot, clear the ground of any rocks, branches, or sharp objects. These can damage the shelter floor and make sleeping uncomfortable. Consider using a tarp or footprint to protect the tent floor from abrasion and moisture when tent camping. Ensure the base is as level as possible for a more comfortable sleep inside the canopy after you stake your tent.
Checking for Hazards Around Your Campground
Before you Assemble your tent, take a moment to check for hazards around your campground. Look for poisonous plants, insect nests, and animal trails at least 200 feet away from your camping site. Be aware of potential falling hazards, such as dead trees or branches. Also, consider the proximity to water sources and avoid setting up your shelter in areas prone to flooding. This step is crucial for ensuring a safe camping journey.
Step-by-Step Guide to Pitch a Tent
Unpacking and Organizing Your Camping Gear
Before you begin to place a tent, efficiently unpacking and organizing your camping gear can streamline the whole process. Ensure all components of your camping shelter, including the tent body, poles, rainfly, and spikes, are readily accessible. A step by step guide can be handy to check you have all the pieces you will need to assemble your tent.
Setting Up Your Tent: Initial Steps
Here’s how to start setting up your tent. These initial steps are crucial for establishing a solid foundation:
- Lay down a footprint or tarp to protect the shelter floor.
- Spread out the canopy body and align it with the footprint.
- Insert the poles into their corresponding sleeves or clips.
Raising the Tent and Securing It Properly
After inserting the poles, carefully raise the camping tent by connecting the tent poles to the corners. Ensure that each pole is securely seated in its grommet or clip before applying pressure. Once the shelter is upright, secure the shelter to the ground using tent stakes. This part of the step-by-step guide is crucial to making sure the canopy is secure to withstand the atmospheric conditions.
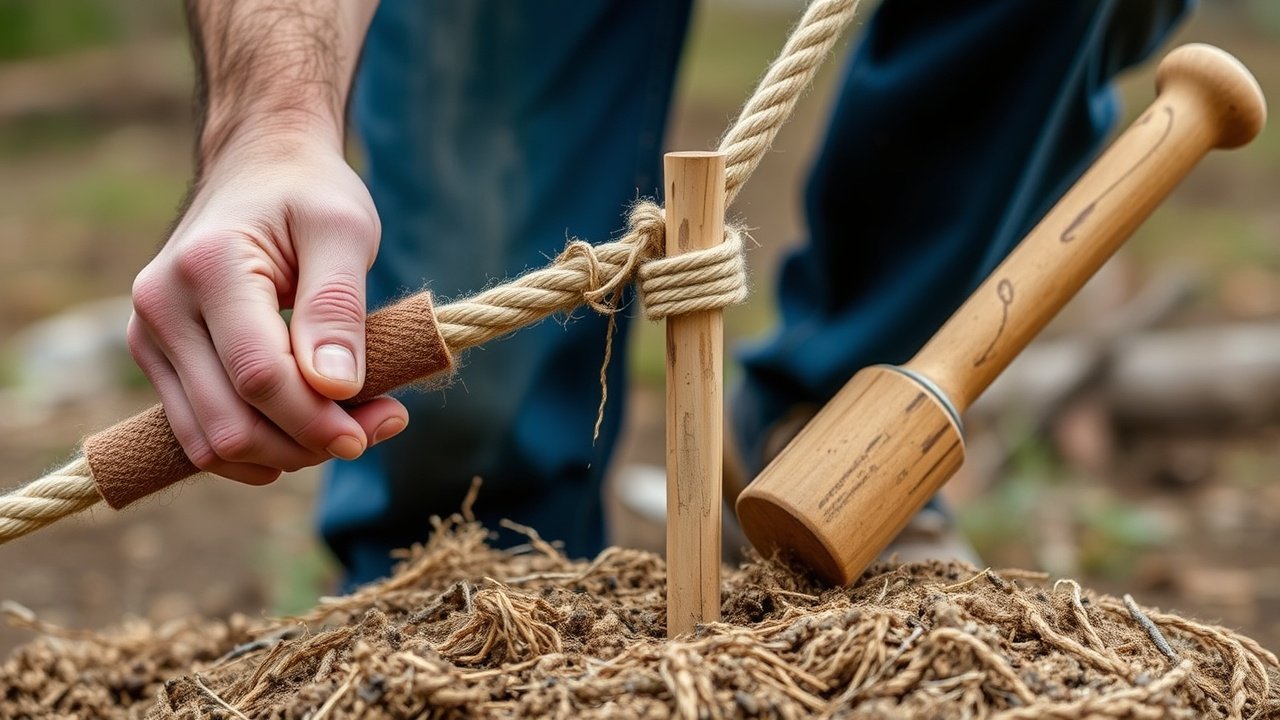
Securing Your Tent with Spikes and Guylines
How to Stake the Tent Effectively
To spike it effectively, start by hammering shelter spikes at a 45-degree angle into the ground at each corner of the shelter. Ensure that the spikes are driven deep enough to provide a secure anchor for the tent. Properly staked shelter can better withstand wind and other environmental factors, enhancing your overall camping knowledge.
Understanding the Importance of Guylines
Guylines are essential for providing additional stability to your canopy, especially in windy climate conditions. These lines attach to loops on the tent body and are staked away from the shelter. By tensioning the guylines, you distribute the force of the wind and prevent the properly pitched tent from collapsing or becoming damaged, allowing you to enjoy a comfortable night. The best camping is safe camping, so take the time to use guylines if your shelter has them.
Tips for Ensuring Stability in Windy Conditions
To ensure stability in windy conditions, use all available guylines and spike them securely. Position your canvas so that the narrowest side faces into the prevailing wind. If necessary, reinforce the spikes with rocks or logs to prevent them from pulling out of the ground. These steps will help you stay safe and comfortable whether you’re camping in exposed areas, ensuring a comfortable night under the stars.
Adding Protection: Using a Rain Fly
What is a Rain Fly and Its Importance
A rainfly is a waterproof cover that goes over the camping tent body, providing an extra layer of protection against rain and condensation.. The rain fly is crucial for keeping the inside of the shelter dry and comfortable in wet atmospheric conditions. Without a rainfly, moisture can seep through the tent fabric, leading to a miserable camping knowledge.
How to Properly Attach a Rain Fly to Your Tent
To properly attach a rainfly, align it with the shelter body and secure it using buckles, clips, or Velcro straps. Ensure that the rainfly covers the entire shelter, including the doors and windows, with the fly on top providing additional protection. Spike the rainfly’s guylines to create a taut, waterproof barrier around the tent. A properly attached rainfly will keep you dry and comfortable during your camping journey.
![Waterproof Hammock Rain Fly [12ft x 9ft] - Portable Large Camping...](https://m.media-amazon.com/images/I/41XXZGTrJ9L._AC_.jpg)
- Outstanding Water Shedding for True All Weather Protection: Our Rain Flies are made from PU 3000 Diamond Ripstop Nylon m…
- Versatile Hex Design: The 12ft by 9ft Asymmetrical hex design gives maximum coverage, even in a torrential downpour. Whe…
- Backpacker Approved: Lightweight, Portable, Reliable & Easy To Set Up. The rain fly and accessories weigh only 1.8 lbs i…
Maintaining Ventilation with a Rain Fly
While a rainfly is essential for protection against the elements, it’s also important to maintain ventilation inside the tent to ensure comfort. Look for rainfly designs with vents or roll-up panels that allow air to circulate. This helps prevent condensation buildup and keeps the inside of the shelter fresh and dry, ensuring a comfortable night’s sleep for every caravan.
Final Checks and Tips for a Successful Tent Arrangement
Inspecting Your Tent for Proper Setup
Before considering your setup complete, meticulously inspect the tent corners and body for any signs of improper installation. Ensure all the Spikes are firmly in place, anchoring the shelter securely to the ground. Confirm the rainfly is correctly attached, providing adequate protection against the climate conditions you’re camping in. Overlooking these final checks can compromise your camping experience.
Adjusting Guylines and Stakes as Needed
Fine-tuning the guylines and Spikes is crucial for a properly pitched shelter. Adjust the guylines to create even tension around the shelter, ensuring stability and preventing excessive sagging. Re-stake it if needed, especially in areas where the ground is soft or uneven. This attention to detail will enhance your canopy’s ability to withstand wind and rain, ensuring a secure and comfortable campsite.
Ensuring Comfort Inside Your Family tent
Once the structure is solid, ensure a clean floor by removing any remaining debris, then arrange your sleeping bags and gear inside the shelter to maximize space and comfort for each caravan. Consider using a groundsheet or tarp to protect the floor from wear and tear. A well-organized interior contributes to a more enjoyable camping journey, especially when you’re camping as a family.
How do you put up a tent step by step?
Here’s a step-by-step guide to pitching a shelter. The process involves several key actions:
- Finding the best spot at your campsite and clearing any large rocks or debris.
- Laying down a footprint or tarp to protect the floor will help keep the tent to protect against moisture and dirt.
- Assembling the poles and inserting them into the corresponding sleeves on the tent body.
- Raising the shelter and attaching the corners to the poles can help keep the tent stable in windy conditions.
- Staking the shelter using spikes and securing the rainfly.
Now you learn how to set up a tent, including how to spike down the shelter securely.
How to correctly use tent stakes?
To correctly use shelter spikes, angle the spikes downward and away from the tent at a 45-degree angle. Drive the spike firmly into the ground, leaving a small portion exposed for easy removal. Ensure that the shelter spike is securely anchored to provide stability for your shelter. Properly staked shelters can withstand wind and other atmospheric conditions. Consider staking guylines away from the properly pitched tent for added stability.
How to set up a 10×20 pop-up shelter?
Setting up a 10×20 pop-up canopy typically involves extending the frame, attaching the canopy, and securing the canopy with spikes. Start by unfolding the frame and locking it into place. Next, attach the canopy to the frame, ensuring it is taut and secure. Finally, spike down the canopy using canopy spikes or sandbags to prevent it from blowing away. Always refer to the manufacturer’s instructions for specific guidance, but these directions will help you pitch your shelter.
how to set up a shelter on concrete
Setting up a shelter on concrete requires alternative methods since traditional stakes cannot be used to stake down the tent. Instead, use sandbags, weights, or concrete anchors to secure the shelter, particularly around the shelter. Position the shelter, attach guylines, and secure them to the weights or anchors. Ensure the shelter is taut and stable, considering wind conditions. This method allows you to place a tent on concrete surfaces effectively. Be sure that you’re pitching your shelter safely.
how to set up a 2-person Tent
follow these steps to assemble a shelter, particularly a two-person shelter, is a fundamental skill for any caravan. Most two-person camping tents are designed for easy setup, often involving a simple pole structure. The step-by-step guide usually starts with laying down a footprint or tarp to protect the floor. Then, the shelter poles are assembled and inserted into the body’s sleeves or clips to form the structure of the new tent. The shelter corners are then attached to the poles, and finally, the spikes are used to spike the shelter to the ground, ensuring it remains stable and secure.
does how to assemble a tent in nature here cookie jam
While “how to assemble a tent in nature here cookie jam” might sound like a whimsical search query, the underlying principle remains the same regardless of the game or real-world scenario. The best camping practices apply: find the best spot, clear the area, and follow a step-by-step guide. In a virtual environment, the mechanics might be simplified, but the goal is always to create a safe and functional shelter. Even if you’re pitching your tent in a cookie jam, the core elements of shelter setup, like staking the shelter properly and considering climate conditions, still apply.
how to setup a tent in hunter call of the wild
In “Hunter: Call of the Wild,” knowing how to set up a shelter can be crucial for survival and strategic gameplay. The game likely simplifies the process, but the principles of selecting a safe and concealed campsite still apply. Players must choose the best spot away from predators, and then follow the game’s instructions to place their tent. The shelter may offer a safe haven and a place to plan your next move, enhancing your overall gaming experience. This can elevate the simulation and make the game even more lifelike.
is it illegal to set up a tent anywhere
It is essential to know that it is illegal to setup a tent anywhere without permission. Most campgrounds and public lands have designated areas where you can place a shelter, but setting up a shelter on private property or in unauthorized locations can lead to fines or legal issues. Always check local regulations and obtain the necessary permits before setting up your tent. Practicing “leave no trace” principles is crucial, ensuring you leave the campgrounds as you found them, respecting the environment and fellow caravans.
where to set up a tent
The best spot to assemble your shelter involves considering several factors. Look for a level area free from large rocks, roots, and standing water around the tent. Ensure the ground is relatively soft to allow for easy staking. Check for overhead hazards like dead branches. Consider the prevailing wind direction and position your shelter so the narrowest side faces the wind to keep the tent stable. If you’re camping in bear country, be aware of food storage regulations and keep a safe distance from cooking areas at campsites. A well-chosen spot makes your camping trip safer and more comfortable.
how to set up a shelter with poles
Setting up a shelter with supports typically involves a series of straightforward steps. Begin by laying out the floor and footprint, then assemble the supports. Insert the supports into the sleeves or clips on the shelter body, creating the shelter’s structure. The corners are then connected to the supports, raising the tent. Use spikes to anchor your shelter securely to the ground, especially at the corners of the shelter. Finally, attach the rainfly for added protection against the elements. A properly pitched canopy will provide a secure and comfortable shelter for your camping knowledge.
FAQ’S About How to Set up your Camping Tent
1. How do you put up a tent step by step?
Lay out the tent, assemble the poles, insert poles into sleeves or clips, raise the tent, stake down the corners, attach the rainfly, and secure guylines.
2. How to correctly use tent stakes?
Push stakes into the ground at a 45-degree angle away from the tent and tighten the guy lines for better stability.
3. Can you just set up a tent anywhere?
No, you should only set up a tent in designated camping areas or where camping is legally allowed.
4. How to set up a tent on concrete?
Use weighted sandbags, water weights, or tie the tent to heavy objects since regular stakes won’t work on concrete.
5. Does “how to set up a tent in nature here” Cookie Jam?
This appears unrelated or unclear, and it may not match a known Cookie Jam level or game phrase.
6. Do “how to set up a tent in nature here” Cookie Jam?
This question seems unclear, but it may refer to a puzzle or level in Cookie Jam rather than real camping instructions.
7. Is it illegal to set up a tent anywhere?
Yes, it can be illegal to set up a tent on private property, sidewalks, parks, or restricted public areas without permission.
8. How to set up a tent in Hunter: Call of the Wild?
Open your inventory, select the tent, choose a valid flat location, and place it where the game allows deployment.
9. How to set up a 10×20 pop-up tent?
Unfold the frame, expand it halfway, attach the canopy top, fully extend the legs, lock the frame, and secure it with weights or stakes.
10. Does “how to set up a tent in nature here”?
This phrase is incomplete or unclear, so it may need more context to provide an accurate answer.